Reading the Symptoms Before You Touch a Tool
A car that won't start isn't giving you one problem - it's giving you a clue. The sounds (or silence) you hear when you turn the key are the first diagnostic data point, and they matter enormously. Skipping this observation step and going straight to swapping parts is one of the most common - and expensive - mistakes owners make. See our article on common diagnostic errors that cost time and money for a fuller picture of why part-swapping without confirmation backfires.
Match what you hear to these four scenarios before doing anything else:
- Silence or a single click: Points strongly to the battery, battery cables, or a seized starter motor.
- Rapid clicking: Classic low-battery symptom - the solenoid is chattering because there isn't enough current to crank the engine.
- Normal crank, engine won't fire: The starting system is working; the fault is in fuel delivery or the ignition/spark system.
- Single loud clunk then nothing: Often a failed starter motor or a seized engine - the latter requiring immediate professional attention.
Write down exactly what you observed. This record guides every step that follows and is useful information if a mechanic ultimately needs to complete the diagnosis.
Safety Before Any Underhood Work
Always work on a cool engine where possible, wear insulated gloves when handling battery terminals, and ensure the vehicle is in Park (or in gear with the parking brake set) before opening the hood. If you smell fuel strongly or see any signs of a fluid leak near ignition components, do not attempt to start the vehicle - move away and contact a professional.
What You'll Need
Gather these tools and resources before beginning. Having everything on hand prevents interruptions mid-diagnosis.
What you will need
Digital multimeter
Measures battery voltage and checks for voltage drop across connections and cables.
OBD-II scanner
Reads stored and pending fault codes that can identify ignition, fuel, or sensor faults.
Jump-start cables or a portable jump starter
Provides an external power source to test whether the battery is the sole cause of a no-crank condition.
Fuel pressure gauge
Checks whether the fuel system is delivering the correct pressure to the injectors.
Circuit test light
A quick secondary check for presence of voltage at fuses, relays, and ignition-circuit terminals.
Owner's manual or factory service information
Provides vehicle-specific voltage specs, fuse locations, and relay positions needed for accurate testing.
Step-by-Step Diagnostic Procedure
Work through these steps in order. Each step either confirms or rules out a fault category, focusing your attention on the next most likely cause. Resist the urge to skip steps - a faulty assumption early in the process cascades into wasted effort later. For a broader look at what owners can realistically accomplish themselves, see Vehicle Self-Diagnosis: What Owners Can Realistically Do Themselves.
Check battery voltage and terminal condition
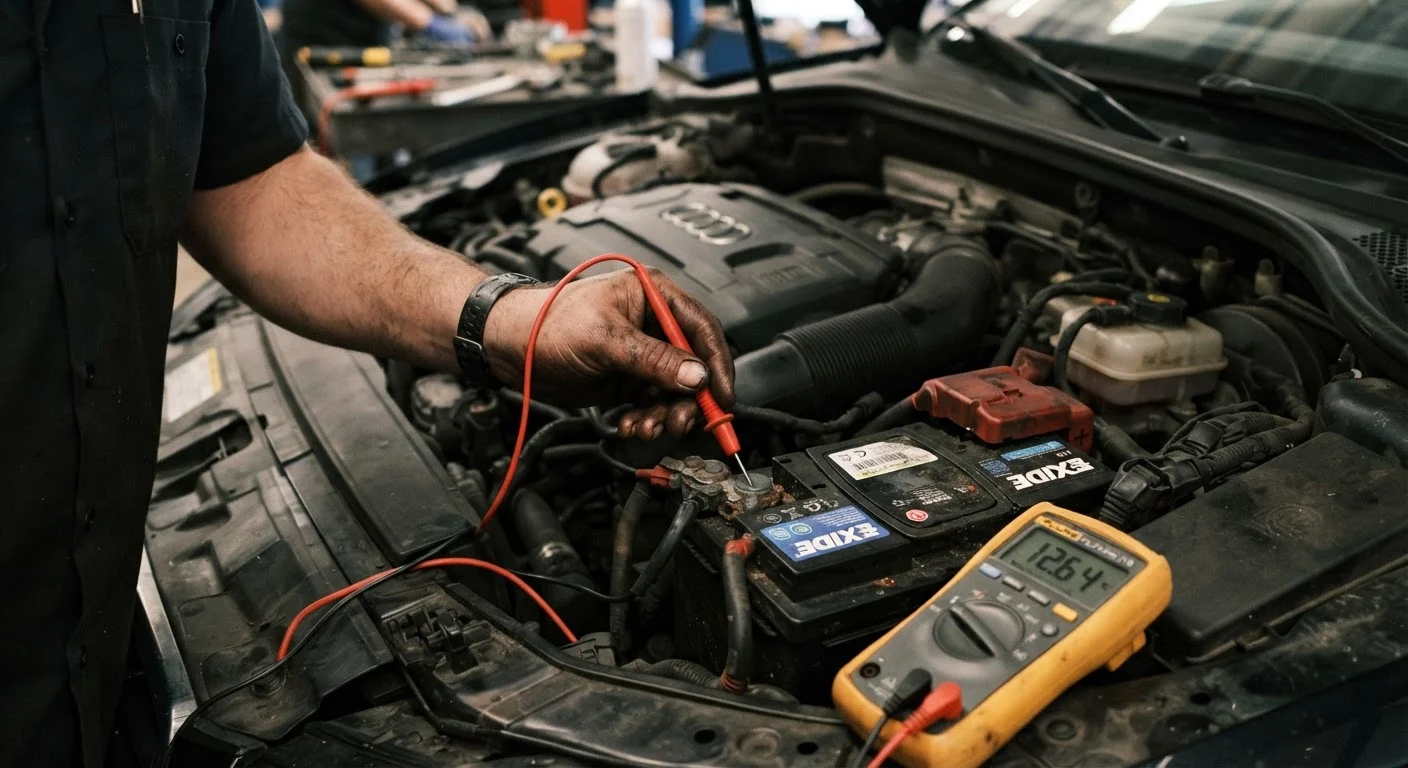
Set your multimeter to DC voltage (20V range). With the ignition off, touch the red probe to the positive battery terminal and the black probe to the negative terminal. A fully charged battery should read 12.6 V or higher at rest. A reading below 12.0 V indicates a discharged or failing battery.
Also inspect both terminals physically: look for white or bluish corrosion, loose clamps, or damaged cables. Poor contact here can mimic a dead battery even when the battery itself is healthy.
Attempt a jump-start to isolate the battery
Connect jump-start cables following the correct sequence: positive to dead battery, positive to good battery, negative to good battery, negative to an unpainted metal ground on the dead vehicle (not the dead battery terminal). Allow the donor vehicle to run for two to three minutes, then attempt to start the car.
If it starts immediately, the battery was the fault. If it still won't crank, the problem lies elsewhere - in the starter motor, ignition switch, or associated wiring.
Inspect fuses and the starter relay
Locate the main fuse box (typically under the hood and sometimes also under the dash - check the owner's manual). Visually inspect and test the main fuse, ignition fuse, and starter relay. Pull the starter relay and swap it with an identical relay from a non-critical circuit to test it. A failed relay is a quick, inexpensive fix that is frequently overlooked.
Test for voltage at the starter motor
With battery voltage confirmed good, have a helper turn the ignition to the Start position while you use a multimeter or test light to check for voltage at the starter's main terminal and the small trigger (solenoid) terminal. Battery voltage should appear at both during cranking. If voltage is present but the starter doesn't operate, the starter motor itself has likely failed. If voltage is absent at the trigger wire, trace the fault back through the ignition switch and neutral safety switch (automatic) or clutch switch (manual).
Verify fuel delivery
If the engine cranks normally but won't fire, turn the ignition to the On position (without cranking) and listen for the fuel pump to prime - a brief, faint whirring sound from the rear of the vehicle lasting one to two seconds. No sound may indicate a failed fuel pump, a blown fuel pump fuse, or a faulty fuel pump relay.
If you have a fuel pressure gauge and the service information for your vehicle, connect it to the Schrader valve on the fuel rail and confirm pressure matches the manufacturer's specification before cranking.
Check for spark and retrieve any fault codes
Remove one spark plug wire or coil connector and attach a spark tester (available at most auto-parts stores) between the wire and a good engine ground. Crank the engine and observe whether a bright blue spark fires consistently. Weak, orange, or absent spark points to the ignition coil, ignition module, crankshaft position sensor, or camshaft position sensor.
Connect your OBD-II scanner and retrieve all stored and pending fault codes. Even a code that seems unrelated can provide crucial context - for example, a crank position sensor code directly explains why the ECM won't allow the engine to fire. Cross-reference any codes with your vehicle's service information before drawing conclusions.
Keep a Simple Diagnostic Log
Note the battery voltage reading, the results of each test, and any fault codes retrieved before attempting any repair. This log prevents repeating steps you've already completed and gives a mechanic a clear starting point if you hand the job over. It also helps you avoid the common trap described in our article on DIY diagnosis myths that lead owners astray.
When to Stop and Call a Professional
Not every no-start condition is owner-serviceable, and recognizing the boundary is just as important as the diagnostic steps themselves. Hand the job to a qualified mechanic when:
- The engine cranks but won't fire and you've confirmed fuel pressure is within spec - the fault may lie in the ECM, crank or cam position sensors, or immobilizer system.
- You suspect a seized engine (single loud clunk, engine won't turn by hand via the crankshaft bolt).
- Fuel system work beyond visual checks is required - fuel under pressure is a fire hazard.
- Stored fault codes point to sensor or control-module faults that need factory-level scan tools to confirm.
If fault codes are present, our guide to reading OBD-II fault codes without a mechanic walks through how to interpret them before committing to a repair. And if your vehicle's faults appear and disappear unpredictably, be aware that intermittent faults are among the hardest problems to diagnose and often require professional-grade logging equipment.
Fuel System Work Carries Fire Risk
Fuel under pressure can spray forcefully and ignite on hot engine surfaces or from a spark. Do not loosen fuel lines, injectors, or the fuel rail unless you have confirmed the system is depressurized and you have appropriate fire-safety precautions in place. If in doubt, have a qualified technician perform any intrusive fuel system testing.