What the Bottom Bracket Actually Does
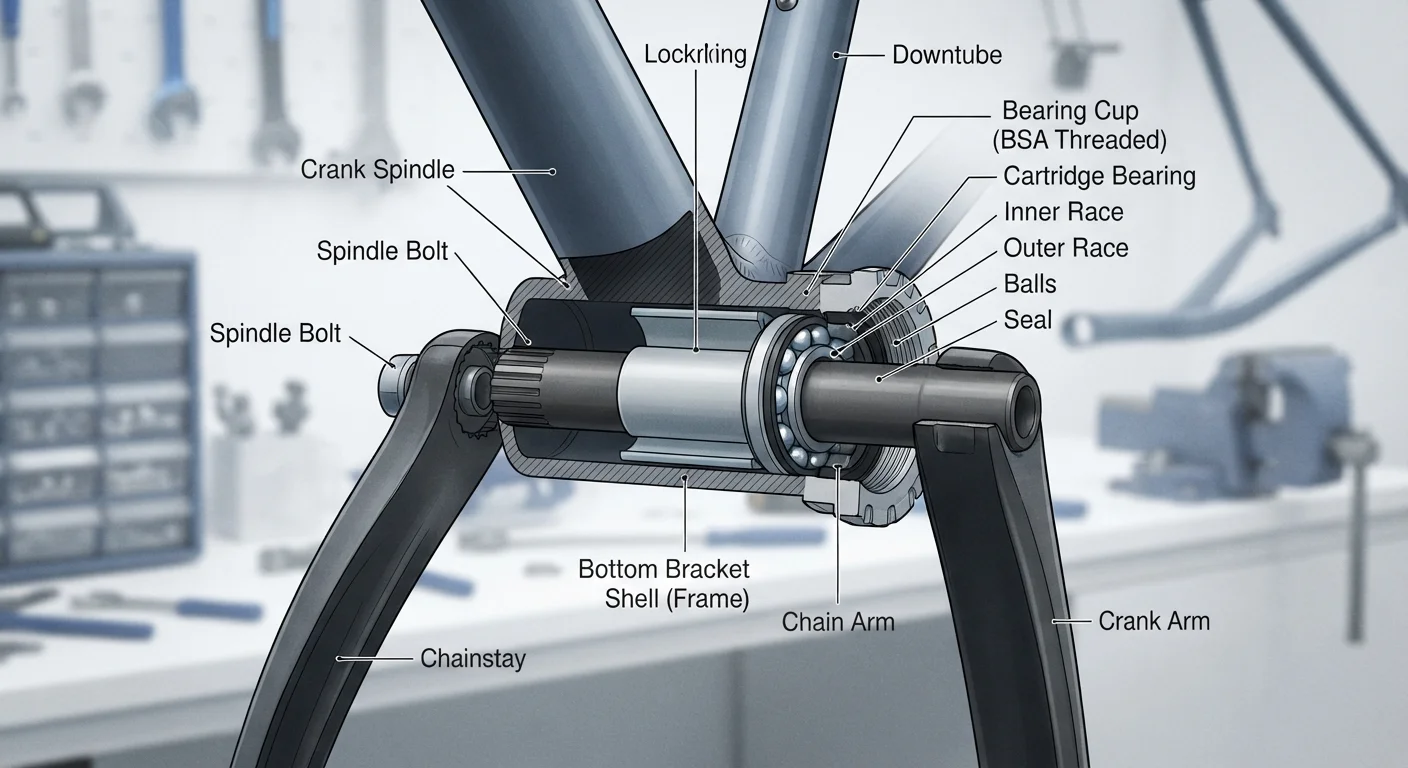
Tucked inside the lowest point of the frame, the bottom bracket is easy to overlook - until it fails. Its job is deceptively simple: hold the crankset spindle in precise alignment while allowing it to rotate with minimal friction. Every watt of power your legs generate passes through this assembly before reaching the chain.
As part of the broader drivetrain, the BB's condition directly influences how efficiently that energy moves forward. Understanding how the full drivetrain works helps illustrate why a failing BB - even one that's only slightly worn - creates drag and vibration felt all the way through the pedals.
68 mm
Standard threaded BB shell width
The BSA/English threaded standard at 68 mm is the most widely used shell width across road and mountain bicycle frames.
3-5+
Major BB standards in active use
Multiple competing standards - threaded, press-fit variants, and T47 - coexist across current bicycle frame production, creating significant compatibility considerations.
Bottom Bracket Standards: Why They Matter
Few areas of cycling generate more compatibility confusion than BB standards. Frames are built around specific shell shapes and diameters; cranksets are designed around particular spindle interfaces. The two must align precisely, or the BB cannot function correctly.
- Threaded (BSA/English): The traditional 68 mm wide, 1.37-inch threaded shell. Right cup is reverse-threaded. Widely regarded as the most serviceable design.
- Italian Threaded: Also 70 mm wide but both cups thread in the same direction. Found on some road frames.
- Press-Fit (BB86, BB92, PF30): Bearing cups pressed directly into an oversized, unthreaded shell. Common on carbon frames for stiffness and weight savings, but more prone to creaking if not installed correctly.
- T47: A newer threaded standard using a larger-diameter shell (47 mm ID), aiming to offer press-fit stiffness with threaded serviceability.
A complete component guide covers how BB standards interact with frame materials and build choices.
Simplify Compatibility Checks Before Buying
Before purchasing a replacement or upgrade BB, record your frame's shell standard and width, then cross-reference the crankset's required spindle interface. Many manufacturers publish compatibility charts on their websites. Bringing both the old BB and crankset specifications to a bike shop reduces the chance of a costly mismatch.
Recognizing Wear and Knowing When to Act
Bottom brackets degrade gradually, which makes it easy to adapt to their declining performance without noticing. The clearest warning signs are:
- Creaking under load: Often most audible on hard pedaling efforts; can be confused with saddle or pedal noise, so isolate carefully.
- Lateral crank movement: Rock the cranks side-to-side with the bike stationary. Any perceptible play indicates bearing wear or cup loosening.
- Rough or gritty rotation: Remove the chain and spin the cranks by hand. Smooth rotation should require almost no effort; grinding or notchiness signals contaminated or worn bearings.
For e-bike riders, BB condition carries additional stakes. Mid-drive motor systems route motor torque directly through the bottom bracket area, accelerating wear compared to unpowered bikes.
Maintenance and Replacement Guidance
Threaded BBs benefit from periodic removal, cleaning, and fresh grease on the threads - typically during other drivetrain service intervals. Press-fit units are generally replaced rather than regreased in the field.
When selecting a replacement, verify three things: shell standard, shell width, and crankset spindle interface. A mismatch on any dimension will either prevent installation or introduce misalignment that accelerates bearing and chainring wear.
Installation torque for threaded cups matters; under-tightening leads to creaking, over-tightening can damage the shell. Use a torque wrench and consult the manufacturer's specification. Press-fit BBs must be pressed in squarely - a misaligned cup causes immediate bearing stress. If you're uncertain about the process, a qualified bike mechanic has the proper tooling and experience to do it correctly.
For a broader look at how individual parts connect, see our full bicycle anatomy breakdown.