How the Three Systems Work
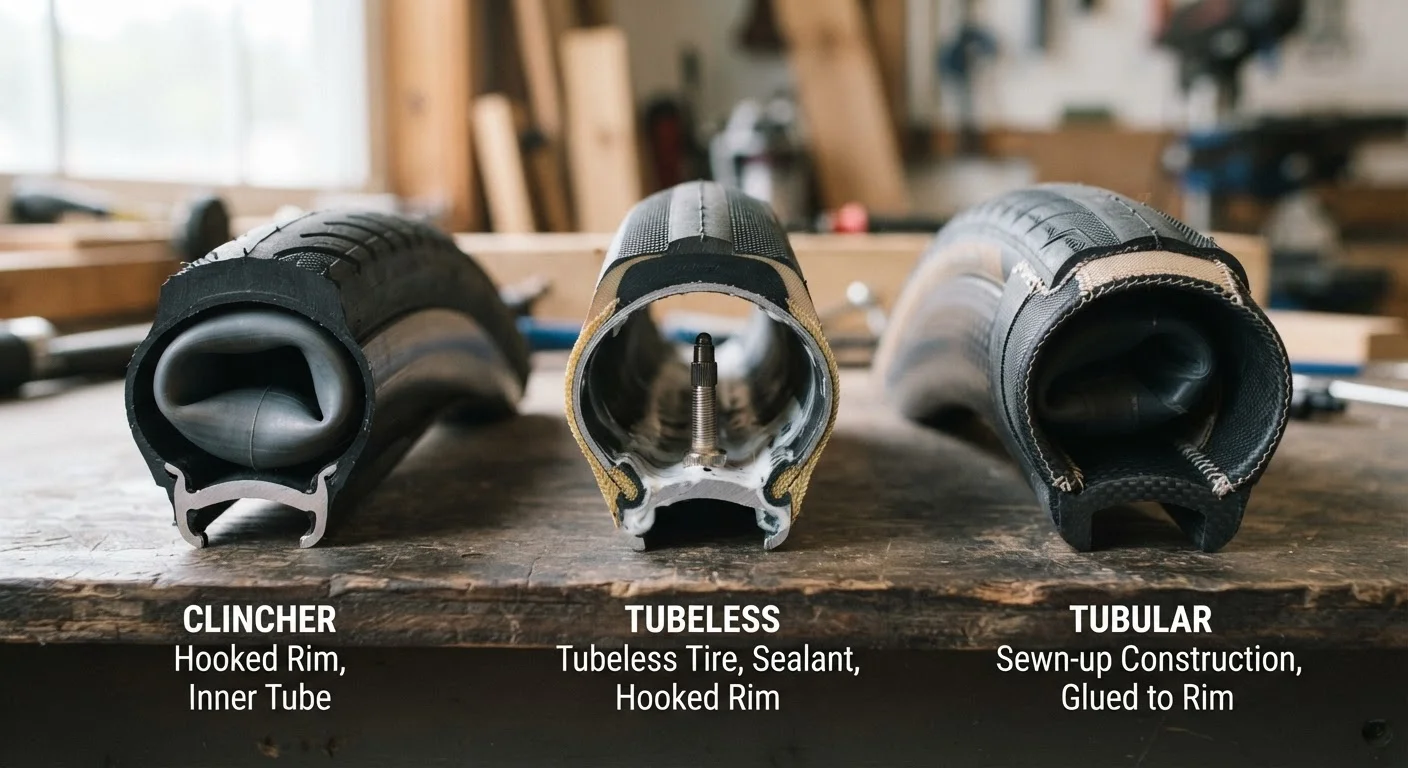
Bicycle tires fall into three distinct construction categories, each with its own interface between rubber and rim. Understanding what sets them apart is the foundation for choosing the right system for your riding style and wheel setup.
Clincher tires are the most common type. A separate inner tube sits inside the tire carcass, and the tire's bead hooks over the rim's inner lip to hold everything in place. Punctures mean removing the wheel, pulling the tire bead off the rim, and replacing or patching the tube - a process manageable with basic tools and minimal experience.
Tubeless tires eliminate the inner tube entirely. A tubeless-compatible rim and tire form an airtight seal, and liquid sealant inside the cavity plugs small punctures automatically. The setup draws from mountain bike technology but is now common across gravel, road, and hybrid categories. See our guide to bicycle wheel construction for context on rim compatibility requirements.
Tubular tires (also called "tubs") have the inner tube sewn directly inside the tire carcass, creating a single sealed unit. This assembly is then glued or taped to a dedicated tubular rim. The system is lighter and offers a distinctive road feel, but roadside repair is essentially not feasible - riders typically carry a spare tubular.
Clincher Tires: Accessibility With Limitations
Clinchers are easy to service without specialized tools
Replacing a punctured inner tube requires only tire levers and a pump - skills most riders develop quickly. Parts are available at virtually every bike retailer in the US.
Tubeless sealant seals small punctures automatically
Liquid sealant inside a tubeless tire can plug thorn or glass punctures within seconds, often without the rider noticing any pressure loss.
Tubeless allows lower pressures without pinch flat risk
Without a tube to pinch between tire and rim, riders can run several PSI lower than with clinchers, improving comfort and grip on rough surfaces.
Tubulars offer low weight and a supple ride character
The sewn-in tube construction and lightweight rim design produce a ride feel that many performance cyclists find distinctly smooth, particularly on high-quality road surfaces.
Clinchers offer the widest tire selection across all categories
Because clinchers dominate the consumer market, riders have the broadest range of tread patterns, widths, and compounds to choose from regardless of riding discipline.
Clinchers are vulnerable to pinch flats at low pressure
Running a clincher tire below the recommended pressure increases the chance of the tube compressing sharply against the rim on impact, causing a characteristic double puncture.
Tubeless initial setup is time-consuming and messy
Seating a tubeless tire bead, applying sealant, and confirming an airtight seal can take 30 minutes or more and typically involves sealant spillage during the process.
Tubeless sealant requires periodic replacement
Liquid sealant dries out over time - typically within two to four months in warmer climates - and must be topped up or replaced to maintain puncture protection.
Tubular roadside repair is not practical
A punctured tubular tire cannot be repaired on the road in any practical sense; riders must carry a complete spare tire and accept the time needed to re-bond it to the rim.
Tubular installation demands care for safe operation
Insufficiently bonded tubular tires risk rolling off the rim during hard cornering or braking, a failure mode with serious safety implications that requires correct technique and adequate curing time.
Tubeless and tubular systems require compatible rims
Neither tubeless nor tubular tires can be used on standard clincher rims without modification or replacement, adding cost and limiting flexibility when changing setups.
Clinchers dominate the market for good reason. Compatible tires and tubes are stocked at nearly every bike shop and many general retailers across the US. Swapping a flat takes roughly five minutes with practice, and no specialized tools or rim preparation are required.
The trade-off is the tube itself. A pinch flat - caused when the tube is compressed between the tire and rim, typically from a sharp impact - is a failure mode unique to tubed systems. Running lower tire pressures to improve comfort increases this risk. Additionally, tubes add rotational weight, which some riders find perceptible on climbs or during acceleration.
If you ride predominantly on pavement or well-maintained paths and prefer a low-maintenance relationship with your bike, clinchers are a rational default. Pair them with the correct pressure for your weight and conditions; our related article on seasonal tire pressure management explains why that number isn't static.
Tubeless Tires: Puncture Resilience at a Setup Cost
Not All Clincher Rims Convert to Tubeless
Some rims marketed as 'tubeless-ready' include pre-taped spoke beds and compatible bead profiles, but standard clincher rims often lack the hook geometry and airtight construction needed for a reliable tubeless seal. Attempting to convert an incompatible rim can result in a tire that seats poorly or loses pressure unpredictably. Always confirm your rim's tubeless compatibility with the manufacturer before investing in tubeless tires and valves.
Tubeless systems offer two concrete advantages: sealant inside the tire seals small punctures - from thorns, glass fragments, or gravel - without the rider noticing, and the absence of a tube allows lower operating pressures without pinch flat risk. Lower pressure translates to a larger tire contact patch, which can improve grip and absorb road vibration.
The setup process, however, is more demanding than clinchers. Tubeless-ready rims require rim tape applied carefully to seal spoke holes, tubeless-compatible valves, and a tire seated with enough force to pop the bead - often requiring a floor pump with a high-volume burst or a compressor. Initial installation can take 20-40 minutes even for experienced riders.
Sealant must be refreshed periodically (typically every few months, depending on climate and riding volume) as it dries out. Large punctures that sealant cannot seal require either a tubeless plug kit or a conventional tube inserted as a backup - so carrying a tube and levers remains advisable. Riders choosing tubeless should also verify their current wheels are tubeless-compatible, as not all clincher rims can be converted reliably.
Tubular Tires: Performance Focus, High Commitment
~60-80 PSI
Typical road tubular operating pressure
Road tubulars are often run at pressures between 60 and 80 PSI for a combination of comfort and rolling efficiency, though exact ranges depend on rider weight and conditions.
2-4 months
Approximate tubeless sealant refresh interval
Industry guidance from sealant manufacturers generally suggests checking and refreshing tubeless sealant every two to four months, with shorter intervals in hot or dry climates.
Tubular tires have been used in professional road racing for decades. The sewn-in tube construction allows higher pressures and, arguably, a more supple ride feel compared to clinchers at equivalent pressure. Because there is no mechanical bead-and-rim interface to maintain, tubular rims can be built lighter. These factors combine to make tubulars attractive for criterium racing, track cycling, and riders who weigh every gram.
The practical barriers are significant. Tubular rims are not compatible with clincher or tubeless tires, representing a dedicated investment. Gluing or taping a tubular correctly - and safely, given that a poorly bonded tire can roll off the rim under braking - requires care and drying time. A flat on a ride typically means finishing on a slowly deflating tire or calling for support, since field repair is not practical.
Cost per tire also runs higher than comparable clincher or tubeless options. For most recreational riders, the performance advantages of tubulars do not outweigh these practical constraints. They remain a purposeful choice rather than an everyday one. Your brake system is another variable to consider alongside tire type - rim versus disc brake differences also affect wheel and tire compatibility decisions.
Choosing the Right System for Your Riding
No tire system is universally superior. The right choice follows from an honest assessment of where you ride, how often you ride, and how much time you're willing to spend on maintenance and initial setup.
Riders covering mixed terrain - gravel paths on some days, pavement on others - may find tubeless particularly compelling, given its puncture resilience across variable surfaces. If you're still working out which bike style best suits your routes, this framework for mixed-terrain bike selection covers complementary considerations.
Wheel compatibility is a non-negotiable starting point. Tubeless and tubular systems each require specific rim designs; you cannot freely switch between systems on the same wheels in most cases. Before committing to a tire system change, confirm rim specifications with your wheel manufacturer or a qualified bike mechanic.
Finally, skill and comfort with roadside repair should factor in. Clinchers demand the least knowledge to fix on the road. Tubeless requires familiarity with plugs and sealant. Tubulars essentially require a backup plan rather than a repair plan. Match the system to your actual capabilities, not an aspirational version of them.