
Why Floor Plans Look the Way They Do
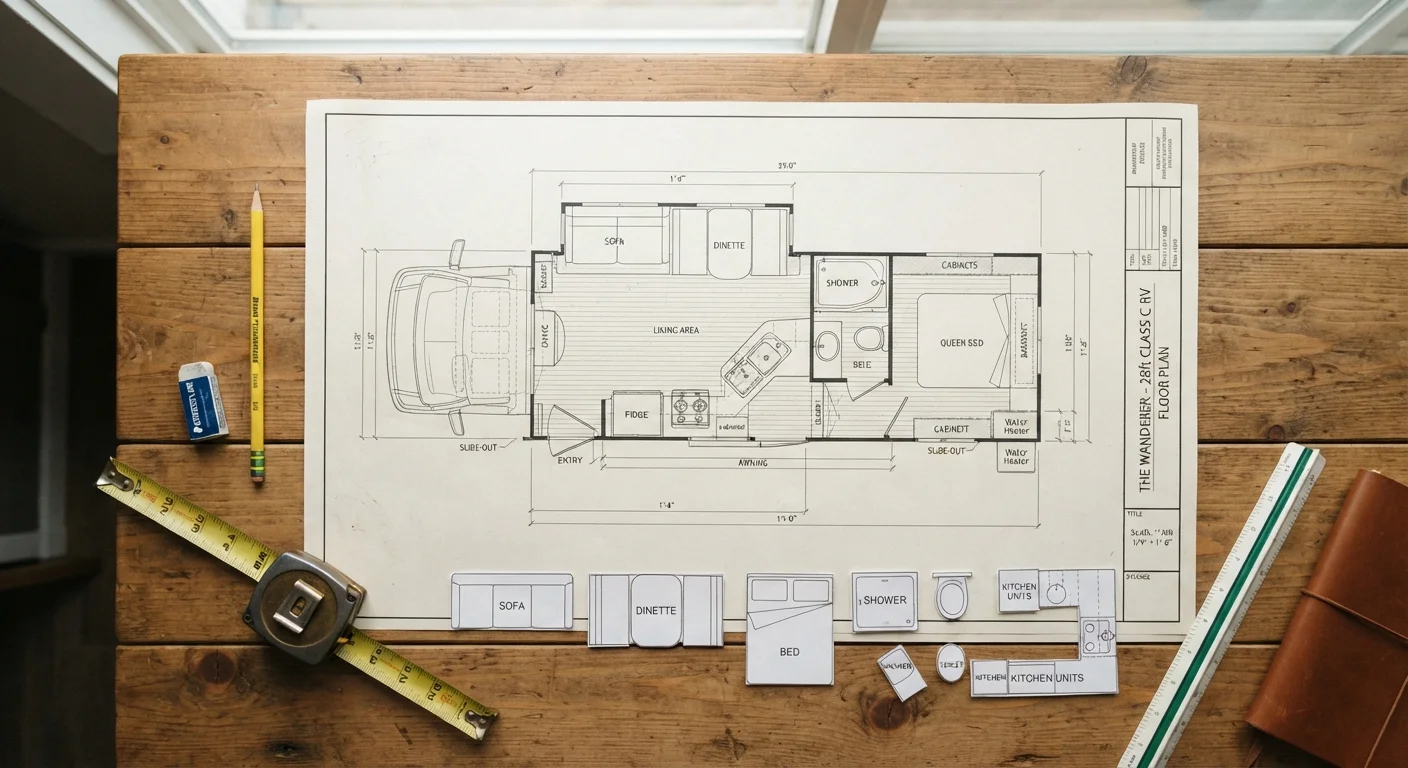
RV floor plans are overhead, top-down diagrams - imagine removing the roof and looking straight down. Every element you see represents a fixed or semi-fixed feature of the interior: the kitchen counter, the bed, the dinette table, the lavatory. Walls are drawn as thick lines; doors appear as thin arcs showing the swing direction; windows are usually indicated by a break or double line along the exterior wall.
Manufacturers produce these diagrams primarily for marketing brochures and online listings, which means they balance accuracy with visual clarity. Some publishers slightly enlarge key spaces - a bathroom or kitchen island - to emphasize features. That's not deception so much as a known convention. Treat every floor plan as a proportional guide rather than an engineering drawing.
For a full grounding in the terminology you'll encounter while reading these diagrams, the Interior Layout Glossary covers every label from dry bath to wardrobe pass-through across all major RV classes.
Decoding the Most Common Symbols
Once you recognize recurring symbols, floor plans become much faster to interpret. Here are the elements you'll encounter most often:
- Slide-outs: Shown as rectangles projecting beyond the main outline, often with a dashed border marking the retracted boundary. Furniture inside a slide is unusable during travel.
- Wet bath vs. dry bath: A wet bath is one undivided room; a dry bath shows a distinct shower stall drawn as a separate enclosed square or rectangle.
- Dinette: A table flanked by bench seats on both sides, usually in a U-shape or booth configuration. Some plans show a convertible dinette that folds flat into a sleeping surface.
- Murphy or fold-down bed: Indicated by a rectangle with a hinge line against one wall, often labeled. During the day it folds up to free floor space.
- Wardrobe/closet: A narrow rectangle along a wall, sometimes hatched to distinguish it from a cabinet.
- Overhead cabinets: Drawn as lighter rectangles above counter surfaces, sometimes with a dashed outline to show they're elevated.
3-6 ft
Interior length lost to exterior overhangs
Industry-standard RV measurement practices include front and rear exterior features in overall length, consistently reducing interior living space from the advertised figure.
~8.5 ft
Typical highway-width exterior limit
Most towable and motorhome RVs are manufactured to a maximum body width of around 8.5 feet to comply with standard U.S. highway regulations.
2-3 ft
Typical slide-out depth when extended
A single slide-out generally adds 2 to 3 feet of usable floor depth to a room when fully deployed, meaningfully expanding living area at a campsite.
Understanding what each symbol represents lets you quickly sort plans that match your lifestyle priorities from those that don't - without ever visiting a showroom.
The Length Problem: What the Numbers Don't Show
Floor plan diagrams list an overall length - commonly 25 ft, 35 ft, 40 ft - but that measurement runs from the very front to the very rear of the exterior, including the hitch, A-frame, and rear bumper. Interior living space can be 3 to 6 feet shorter depending on RV class and configuration.
Width has a similar caveat. The exterior width figure includes the body walls; slide-outs extend that, but only when deployed at a campsite. On a narrow lot or when parked without slide clearance, your effective living width is just the main cabin.
For more on how advertised dimensions translate to actual day-to-day space, see Common Misconceptions About RV Square Footage. Class matters here too - RV Classes Compared breaks down how space translates across motorhome and towable categories.
Use a Scale Reference When Comparing Plans
Print or screenshot two floor plans you're comparing and set them to the same scale using the stated overall length as your reference dimension. Laying them side by side at equal scale makes spatial differences - like a narrower galley or a shorter bedroom - immediately obvious in a way that scrolling through separate listings cannot replicate.
Putting Floor Plans Into Practice
Comparing floor plans on paper is a starting point, not a finish line. Once you've narrowed to two or three diagrams that look right, test the layout mentally by walking through a typical day: where do you make coffee, where does everyone sit for dinner, where do kids or pets sleep, where does wet gear go after a hike?
If your situation involves a home office setup, traveling with children, or sharing space with a pet, the Reading an RV Layout for Your Life Situation guide maps specific floor plan features to those real-world needs. And before finalizing any decision, running through the Floor Plan Evaluation Checklist ensures you haven't overlooked sleeping capacity, egress, or daily livability factors that brochures rarely emphasize.
Floor plans are tools for elimination as much as selection - the goal is to rule out layouts that clearly won't work before spending time on in-person visits.